F# JWT with RSA

I haven’t blogged in some time, as I was busy with another project. In said project I need JSON Web Tokens (JWT) with asynchronous cryptography to be able to validate the JWT without sharing a secret key.

I’m not going to explain JWTs themselves and concentrate on how to use them with F#. If you want to learn more about JWT check out jwt.io. The code is based on a C# example from here: .NET Core 3.1 signing JWT with RSA

The example script uses the RC1 of .NET 5 with F# 5 features, so make sure you have installed the correct SDK to be able to run it.

RSA Key-Pair

To be able to sign and validate a JWT with RSA, we need a public and a private key, just like you know it from SSH or TLS in the browser. You can generate a key-pair using openssl on the command line or use an online tool like Online RSA Key Generator to generate the key pair. If you use openssl, make sure to export the private key without a password for the example to run.

If you are going to use the code in production, it is better to have an encrypted private key. To be able to use one, just switch the import method to one that supports encrypted keys. For more information check the RSA.Create Method documentation.

You should now have a private and a public RSA key which look like this:

-----BEGIN RSA PRIVATE KEY-----
MIIEogIBAAKCAQEAnzyis1ZjfNB0bBgKFMSvvkTtwlvBsaJq7S5wA+kzeVOVpVWw
kWdVha4s38XM/pa/yr47av7+z3VTmvDRyAHcaT92whREFpLv9cj5lTeJSibyr/Mr
...
-----END RSA PRIVATE KEY-----
-----BEGIN PUBLIC KEY-----
MIIBIjANBgkqhkiG9w0BAQEFAAOCAQ8AMIIBCgKCAQEAnzyis1ZjfNB0bBgKFMSv
vkTtwlvBsaJq7S5wA+kzeVOVpVWwkWdVha4s38XM/pa/yr47av7+z3VTmvDRyAHc
...
-----END PUBLIC KEY-----

Save the private key as key.priv and the public key as key.pub.

As we need the keys as a byte array without any headers, footers or line breaks, we define a function that reads a key file and strips it of all unwanted information and converts it to an byte array.

let readKey file =
    let content = File.ReadAllText file
    content.Replace("-----BEGIN RSA PRIVATE KEY-----", "").Replace("-----END RSA PRIVATE KEY-----", "")
           .Replace("-----BEGIN PUBLIC KEY-----", "").Replace("-----END PUBLIC KEY-----", "").Replace("\r\n", "")
           .Replace("\n", "")
    |> Convert.FromBase64String

The method is not pretty and I’m sure the is a more elegant way to achieve the same result, but it works and is easy to understand.

Now lets read the key-pair into values to be used later.

let pubKey = readKey "key.pub"
let privKey = readKey "key.priv"

Payload

As we don’t want to create an JWT just for the lulz, we need some payload to sign and later validate. For the example, we make it as easy a possible and define a payload with just two members.

type Payload = { Name: String; Admin: bool }
let payload = { Name = "John Doe"; Admin = true }

That is the content of our JWT, besides the header which I’ll not explain in this blog post.

Create and sign the JWT

Lets create a function that takes a payload and a private key and returns a signed JWT. In that function, we create a new RSA object and import the private key. After that we create the needed credentials and disable the cache for the signatures, as we don’t need that in our case. Next we add the claims, which is out payload. Note that all values have to be of type String. As a last step we create a JWT and write the token to a string which is returned by the function.

let sign payload privKey =
    use rsa = RSA.Create()
    let mutable bytesRead = 0
    rsa.ImportRSAPrivateKey(new ReadOnlySpan<byte>(privKey), &bytesRead)

    let crypProvFactory =
        new CryptoProviderFactory(CacheSignatureProviders = false)

    let signingCredentials =
        new SigningCredentials(new RsaSecurityKey(rsa),
                               SecurityAlgorithms.RsaSha256,
                               CryptoProviderFactory = crypProvFactory)

    let claims =
        [| new Claim(nameof (payload.Name), payload.Name)
           new Claim(nameof (payload.Admin), payload.Admin.ToString()) |]

    let jwt =
        new JwtSecurityToken(claims = claims, signingCredentials = signingCredentials)

    let jwtHandler = new JwtSecurityTokenHandler()
    jwtHandler.WriteToken(jwt)

Validate the JWT

Imagen we sent the token over the network to some other service and want to know if the token is valid and authenticated through the private-key. To do so, we need to create a validation function which checks the RSA signature with the public-key.

Again, we are creating a RSA object and importing the corresponding key. After that we configure what should be validated in the token. As we did not set any Issuer, Audience or Lifetime for the token, we don’t validate them. Unfortunately the ValidateToken function does not return a true or false, but instead throws an exception if the validation failed. As such we need to misuse a try-catch for control flow. Our method returns true if the token signature is valid and false if not.

let validate (token: string) pubKey =
    CryptoProviderFactory.Default.CacheSignatureProviders <- false
    use rsa = RSA.Create()
    let mutable bytesRead = 0
    rsa.ImportSubjectPublicKeyInfo(new ReadOnlySpan<byte>(pubKey), &bytesRead)

    let validationParameters =
        new TokenValidationParameters(ValidateIssuer = false,
                                      ValidateAudience = false,
                                      ValidateLifetime = false,
                                      ValidateIssuerSigningKey = true,
                                      IssuerSigningKey = new RsaSecurityKey(rsa))

    let handler = new JwtSecurityTokenHandler()
    let mutable validatedToken: SecurityToken = upcast new JwtSecurityToken()

    try
        handler.ValidateToken(token, validationParameters, &validatedToken)
        |> ignore
        true
    with ex ->
        printfn $"Exception: {ex.Message}"
        false

That’s all we need to do, to sign a JWT with a private key and validate the signature with a public key.

Full Code

The working example can be found on GitHub: F# JWT RSA Example

The example on GitHub contains an example key-pair. Make sure to never use them in production as everyone has access to the private key. Always create a fresh pair!

#r "nuget: System.IdentityModel.Tokens.Jwt"
#r "nuget: Microsoft.IdentityModel.Tokens"

open System.IdentityModel.Tokens.Jwt
open System
open System.IO
open System.Text
open System.Security.Claims
open System.IdentityModel.Tokens.Jwt
open Microsoft.IdentityModel.Tokens
open System.Security.Cryptography

type Payload = { Name: String; Admin: bool }

let readKey file =
    let content = File.ReadAllText file
    content.Replace("-----BEGIN RSA PRIVATE KEY-----", "").Replace("-----END RSA PRIVATE KEY-----", "")
           .Replace("-----BEGIN PUBLIC KEY-----", "").Replace("-----END PUBLIC KEY-----", "").Replace("\r\n", "")
           .Replace("\n", "")
    |> Convert.FromBase64String

let pubKey = readKey "key.pub"
let privKey = readKey "key.priv"

let sign payload privKey =
    use rsa = RSA.Create()
    let mutable bytesRead = 0
    rsa.ImportRSAPrivateKey(new ReadOnlySpan<byte>(privKey), &bytesRead)

    let crypProvFactory =
        new CryptoProviderFactory(CacheSignatureProviders = false)

    let signingCredentials =
        new SigningCredentials(new RsaSecurityKey(rsa),
                               SecurityAlgorithms.RsaSha256,
                               CryptoProviderFactory = crypProvFactory)

    let claims =
        [| new Claim(nameof (payload.Name), payload.Name)
           new Claim(nameof (payload.Admin), payload.Admin.ToString()) |]

    let jwt =
        new JwtSecurityToken(claims = claims, signingCredentials = signingCredentials)

    let jwtHandler = new JwtSecurityTokenHandler()
    jwtHandler.WriteToken(jwt)


let validate (token: string) pubKey =
    CryptoProviderFactory.Default.CacheSignatureProviders <- false
    use rsa = RSA.Create()
    let mutable bytesRead = 0
    rsa.ImportSubjectPublicKeyInfo(new ReadOnlySpan<byte>(pubKey), &bytesRead)

    let validationParameters =
        new TokenValidationParameters(ValidateIssuer = false,
                                      ValidateAudience = false,
                                      ValidateLifetime = false,
                                      ValidateIssuerSigningKey = true,
                                      IssuerSigningKey = new RsaSecurityKey(rsa))

    let handler = new JwtSecurityTokenHandler()
    let mutable validatedToken: SecurityToken = upcast new JwtSecurityToken()

    try
        handler.ValidateToken(token, validationParameters, &validatedToken)
        |> ignore
        true
    with ex ->
        printfn $"Exception: {ex.Message}"
        false

let payload = { Name = "John Doe"; Admin = true }
printfn $"Payload: {payload}"

let token = sign payload privKey
printfn $"Signed JWT: {token}"

let isValid = "Valid token"
let isInvalid = "Invalid token"
printfn $"Validate: {if validate token pubKey then isValid else isInvalid}"

Run the Script

We can run the script, called jwt.fsx, with the following command:

dotnet fsi --langversion:preview .\jwt.fsx

The result should look like this:

Payload: { Name = "John Doe"
  Admin = true }
Signed JWT: eyJhbGciOiJSUzI1NiIsInR5cCI6IkpXVCJ9.eyJOYW1lIjoiSm9obiBEb2UiLCJBZG1pbiI6IlRydWUifQ.ma49T3npXQJVMa-afyfFgIPW5PEYhrrYvX2mUA6rmzXHXq_Wy-ij9MLc0b6UxZX8STcRrSC93meIMa4a8LI7UBe0Pxn8IQBrhXztcElMfktMQoQWb7Osx9XwmqD1CaQWwz3FX963B4fQFdxx7GpxdLPj-CSOJZ4OZbk8fWpurVX1QXMLokaJ8C-gLB026jFVJjIV1APSMOnAzx9lcZfU5m3jwVP8HMIc0yJkm4d7IJO1lQjYnUWQkY_DmwR8-vysqo3N5yY57xQUFRoyHwFofDb25fA6SkKcNHrOX0_bc7KzxzWacoPWgtUolThKasWpXgqHipR-uJ4hz6zahInCmw
Validate: Valid token

The token consists of three parts separated by an dot. The first part is the header, the second the payload and third the signature.

If we decode (base64) the token we get three pars:

// The JWT header
{
  "alg": "RS256",
  "typ": "JWT"
}
// The payload
{
  "Name": "John Doe",
  "Admin": "True"
}
// Signature
...

Add an import to a PE file

In the last blog posts we’ve seen how to add and remove a section from a PE file. This time, we add an import to a PE file. This can be useful to inject your own code from a DLL. As usual we use the PeNet Library to edit the PE file.

From a high-level view we need to do the following steps to add an import to a PE file.

  • Add a new section to gain space for additional imports
  • Copy the old IMAGE_IMPORT_DESCRIPTOR array to the new section
  • Point the import entry in the IMAGE_DATA_DIRECTORY array to the new position of the IMAGE_IMPORT_SCRIPTOR array and adjust the size.
  • Add the new imports
    • Add the module/DLL name
    • Add the IMPORT_BY_NAME array, e.g. the functions to import from the module/DLL
    • Add the IMAGE_THUNK_DATA arrays which point to the IMPORT_BY_NAME structures.
    • Add an IMAGE_IMPORT_DESCRIPTOR where the Name entry points to the name we added and the FirstThunk to the IMAGE_THUNK_DATA array we added.

We do not have to distinguish between the case that a function is imported from a DLL which is already present in the import descriptors or from a new DLL. We can have multiple import descriptors for the same DLL, so we do not have to re-locate any structure if we need to add a function to an existing import descriptor. Instead we just add a new import descriptor for the same DLL.

To understand the code in this post, it’s important to understand how imports work in the PE header. A very good overview is given here: PE 102

Before we start to relocate the imports, we need to get a few values from the PE header.

// The size of an IMAGE_IMPORT_DESCRIPTOR struct
var sizeOfImpDesc = 0x14;
// The size of an IMAGE_THUNK_DATA struct, depending on the bitness of the PE file. 
var sizeOfThunkData = Is32Bit ? 4 : 8;
// Get the number of imports we want to add
var numAddImpDescs = additionalImports.Count();
// Get the current virtual address import directory.
var importRva = ImageNtHeaders.OptionalHeader.DataDirectory[(int)DataDirectoryType.Import].VirtualAddress;
// Get the size of the current import directory.
var importSize = ImageNtHeaders.OptionalHeader.DataDirectory[(int)DataDirectoryType.Import].Size;
// Get the section header of the section, which contains the import directory.
ImageSectionHeader getImportSection()
   => ImageSectionHeaders.First(sh => sh.VirtualAddress + sh.VirtualSize >= importRva);
var impSection = getImportSection();
// Estimate the needed addtional space
int estimateAdditionalNeededSpace()
    => (int)(additionalImports.Select(ai => ai.Functions).Count() * 64 + importSize); // Better a bit too much...
var additionalSpace = estimateAdditionalNeededSpace();

First we add a new section and then we move the old IMAGE_IMPORT_DESCRIPTOR array to the new section. We need a new section with additional space to fit our additional imports into. The name of the new section doesn’t matter, in out case we call it .addImp. It’s important to set the correct section characteristics, else we break the PE file.

AddSection(".addImp", (int)(impSection!.SizeOfRawData + additionalSpace), (ScnCharacteristicsType)0xC0000000);
var newImpSec = ImageSectionHeaders.First(sh => sh.Name == ".addImp");
var oldImpDescBytes = RawFile.AsSpan(importRva.RvaToOffset(ImageSectionHeaders), importSize);
RawFile.WriteBytes(newImpSec.PointerToRawData, oldImpDescBytes);

Now, we need to redirect the import directory entry in the IMAGE_DATA_DIRECTORY array to the new position of the import directory in the section we just added.

ImageNtHeaders.OptionalHeader.DataDirectory[(int)DataDirectoryType.Import].VirtualAddress = newImpSec.VirtualAddress;
ImageNtHeaders.OptionalHeader.DataDirectory[(int)DataDirectoryType.Import].Size = (uint)(importSize + (sizeOfImpDesc * numAddImpDescs));
var newImportRva = ImageNtHeaders.OptionalHeader.DataDirectory[(int)DataDirectoryType.Import].VirtualAddress;
var newImportSize = ImageNtHeaders.OptionalHeader.DataDirectory[(int)DataDirectoryType.Import].Size;
// Save the physical address of the additional free space in the new section. We are going to add the new imports there.
var paAdditionalSpace = newImpSec.PointerToRawData + newImportSize;

Before we add the new imports, we need to define a few helper functions that do the heavy lifting for us.

// Add the new module/DLL name to the PE header
// The name is a zero terminated ASCII string.
// Return the physical address of the added module name string.
uint AddModName(ref uint offset, string module)
{
    var tmp = Encoding.ASCII.GetBytes(module);
    var mName = new byte[tmp.Length + 1];
    Array.Copy(tmp, mName, tmp.Length);

    var paName = offset;
    RawFile.WriteBytes(offset, mName);

    offset = (uint)(offset + mName.Length);
    return paName;
}

// Add an IMAGE_IMPORT_BY_NAME struct per 
// function that gets imported from the module.
List<uint> AddImpByNames(ref uint offset, List<string> funcs)
{
    var adrList = new List<uint>();
    foreach (var f in funcs)
    {
        var ibn = new ImageImportByName(RawFile, offset)
        {
            Hint = 0,
            Name = f
        };

        adrList.Add(offset);
        offset += (uint)ibn.Name.Length + 2;
    }

    // Add zero DWORD to end the array
    RawFile.WriteUInt(offset + 1, 0);
    offset += 5;
    return adrList;
}

// Add an IMAGE_THUNK_DATA structs for each IMAGE_IMPORT_BY_NAME struct we added 
// and point the AddressOfData to the IMAGE_IMPORT_BY_NAME struct.
uint AddThunkDatas(ref uint offset, List<uint> adrList)
{
    var paThunkStart = offset;

    foreach (var adr in adrList)
    {
        new ImageThunkData(RawFile, offset, Is64Bit)
        {
            AddressOfData = adr.OffsetToRva(ImageSectionHeaders!)
        };

        offset += (uint)sizeOfThunkData;
    }

    // End array with empty thunk data
    new ImageThunkData(RawFile, offset, Is64Bit)
    {
        AddressOfData = 0
    };

    offset += (uint)sizeOfThunkData;
    return paThunkStart;
}

As a last step, we add a new IMAGE_IMPORT_DESCRIPTOR for each module and point it to an array of IMAGE_THUNK_DATA, which contains a pointer to the IMAGE_IMPORT_BY_NAME, which contains the function to import. Easy right?

 void AddImportWithNewImpDesc(ref uint tmpOffset, ref long paIdesc, AdditionalImport ai)
{
    var paName = AddModName(ref tmpOffset, ai.Module);
    var funcAdrs = AddImpByNames(ref tmpOffset, ai.Functions);
    var thunkAdrs = AddThunkDatas(ref tmpOffset, funcAdrs);

    new ImageImportDescriptor(RawFile, paIdesc)
    {
        Name = paName.OffsetToRva(ImageSectionHeaders),
        OriginalFirstThunk = 0,
        FirstThunk = thunkAdrs.OffsetToRva(ImageSectionHeaders),
        ForwarderChain = 0,
        TimeDateStamp = 0
    };
    paIdesc += (uint)sizeOfImpDesc;
}

var paIdesc = newImportRva.RvaToOffset(ImageSectionHeaders) + ImageImportDescriptors!.Length * sizeOfImpDesc;
var tmpOffset = paAdditionalSpace;

// Add new imports
foreach(var ai in additionalImports)
{
    AddImportWithNewImpDesc(ref tmpOffset, ref paIdesc, ai);
}
 
// End with zero filled idesc
new ImageImportDescriptor(RawFile, paIdesc)
{
    Name = 0,
    OriginalFirstThunk = 0,
    FirstThunk = 0,
    ForwarderChain = 0,
    TimeDateStamp = 0
 };

And that’s all! Now reparse the imports and you will find your additions in the list.

As we already showed how it works here, there is an easy to use function in PeNet which allows you to add one or more imports to an existing PE file.

You can find the full documentation here: Adding Imports with PeNet but here is the code for your reference.

// Add only one import
var peFile = new PeFile("myapp.exe");
peFile.AddImport("gdi32.dll", "StartPage");
// Add multiple imports
var peFile = new PeFile("myapp.exe");

var ai1 = new AdditionalImport("gdi32.dll", new List<string> { "StartPage" });
var ai2 = new AdditionalImport("ADVAPI32.dll", new List<string> { "RegCloseKey" });
var importList = new List<AdditionalImport> {ai1, ai2};

peFile.AddImports(importList);

How to add a section to a PE file

In one of my last post I showed how a section can be removed from a PE file. This time we are doing the opposite. Adding a section can be useful to add own code, resources or relocate parts of the PE header itself to get more space for changes. Again we use the PeNet Library to parse and modify the PE header.

From a high-level view we have to do the following steps:

  • Append a the new section content at the end of the PE file
  • Add a new entry in the IMAGE_SECTION_HEADER array
  • Increase the NumberOfSections in the IMAGE_FILE_HEADER
  • Adjust the SizeOfImage in the IMAGE_OPTIONAL_HEADERS

First we add the content of the new section to the end of the PE file. In our example we add an empty section which consists only of null-bytes.

// "size" = size of the section to add
// "paNewSec" = physical address of the new section at the end of the file
var paNewSec = RawFile.AppendBytes(new Byte[size]);

The second step is the most important one. Here we add a new IMAGE_SECTION_HEADER entry to the IMAGE_SECTION_HEADER array, such that the PE loader knows that an additional section exists.

// "name" is a max. eight characters long name for the new section
// "size" is the size of the new section in bytes
// "getNewSecVA" computes the new virtual address of the section
// "characteristics" which the new section should have, e.g. "executable, readable" and so on.
// All other values can be set to "0"
var newSection = new ImageSectionHeader(RawFile, getNewSecHeaderOffset(), ImageNtHeaders.OptionalHeader.ImageBase)
{
   Name = name,
   VirtualSize = (uint)size,
   VirtualAddress = getNewSecVA(),
   SizeOfRawData = (uint)size,
   PointerToRawData = (uint)paNewSec,
   PointerToRelocations = 0,
   PointerToLinenumbers = 0,
   NumberOfRelocations = 0,
   NumberOfLinenumbers = 0,
   Characteristics = characteristics
 };

The VirtualSize and SizeOfRawData can be aligned to the FileAlignment and SectionAlignment but it is optional as the Windows loader accepts not aligned sizes as well, so we skip this step.

The new virtual address of the new section needed for the IMAGE_SECTION_HEADER above is computed like this:

uint getNewSecVA()
{
    var lastSec = ImageSectionHeaders.OrderByDescending(sh => sh.VirtualAddress).First();
    var vaLastSecEnd = lastSec.VirtualAddress + lastSec.VirtualSize;
    var factor = vaLastSecEnd / (double)ImageNtHeaders.OptionalHeader.SectionAlignment;
    return (uint)(Math.Ceiling(factor) * ImageNtHeaders.OptionalHeader.SectionAlignment);
}

First, we get the section with the highest virtual address, as our new section should be mapped behind this section. Then we compute the virtual end address of the currently highest section to get the start address of our new section. As a virtual address of a section has to be aligned to the SectionAlignment from the IMAGE_OPTIONAL_HEADER, we round the new virtual address up to the next section alignment.

The next step is to increase the number of sections in the IMAGE_FILE_HEADER.

ImageNtHeaders.FileHeader.NumberOfSections = (ushort)(ImageNtHeaders.FileHeader.NumberOfSections + 1);

As our PE file is now larger than before, we need to adjust the SizeOfImage in the IMAGE_OPTIONAL_HEADER as well.

ImageNtHeaders.OptionalHeader.SizeOfImage = getNewSizeOfImage();
// Size is computed like this
uint getNewSizeOfImage()
{
    var factor = size / (double)ImageNtHeaders.OptionalHeader.SectionAlignment;
    var additionalSize = (uint)Math.Ceiling(factor) * ImageNtHeaders!.OptionalHeader.SectionAlignment;
    return ImageNtHeaders.OptionalHeader.SizeOfImage + additionalSize;
}

The computation of the new image size is similar to the computation of the new virtual address as it has to be aligned to the section alignment as well.

That’s already all we have to do. A new section is added and the PE file can be run. One thing that could happen is that there is no free space after the IMAGE_SECTION_HEADER array to add any new sections. In that case we would overwrite something in the PE header and break the executable, but this is very unlikely as there is usually enough space available to add at least one more section.

The functionality is implemented in the PeNet Library and can be used like this:

using PeNet;
using System.IO;
 
namespace StripSection
{
    class Program
    {
        static void Main(string[] args)
        {
            using var peFile = new PeFile("calc.exe");
     
            // Add section with 100 bytes in size
            peFile.AddSection(".newSec", 100, (ScnCharacteristicsType)0x40000040);

            // Save the changed binary to disk
            File.WriteAllBytes("calc-newsec.exe", peFile.RawFile.ToArray());
        }
    }
}

.NET Random Access Performance on Files – Part 2

In the first part of the blog post, I tested the speed of random access in byte arrays, streams and buffered streams. In the second part I’ve added benchmarks for memory mapped files as an addition.

Test Scenario

The test scenario is the same as in the previous post, but with four additional cases. The table below shows only the new test cases.

MethodDescription
ByteFromViewStreamMap a file to memory as a MemoryMappedFile and create a MemoryMappedViewStream on it to read random bytes from it.
IntFromViewStreamMap a file to memory as a MemoryMappedFile and create a MemoryMappedViewStream on it to read random integers from it.
ByteFromViewAccessorMap a file to memory as a MemoryMappedFile and create a MemoryMappedViewAccessor on it to read random bytes from it.
IntFromViewAccessorMap a file to memory as a MemoryMappedFile and create a MemoryMappedViewAccessor on it to read random integers from it.
Additional random access methods to read a byte or integer from a file.

Test Environment

The test environment is the same as before. See the previous post for more information.

Test Results

After the benchmark completed, we got the following results.

Runtime of the different methods and file sizes in bytes.

While the first six methods stay unchanged, the two new additional methods IntFromViewStream and IntFromViewAccessor show some great performance. They can only be beaten slightly by the IntFromArray and IntFromDataReader on very small files. For each file larger than 10 kB, they perform the best. It seems that the IntFromViewAccessor is slightly ahead of the IntFromViewStream. This are some really good results!

We know now that the memory mapped file methods are really fast. Now let’s check the results for allocated memory.

Allocated memory in kB per method.

The memory usage of the two new methods is so low that it’s not even visible on the chart. The result is not surprising as the hole purpose of a memory mapped file is to be able to access a huge file, without the need to load it into memory completely. Even the streams seem to use a tiny bit more memory to access the underlying file. As for the streams, the memory usage is constant and does not depend on the file size.

Conclusion

In conclusion we can say that the the IntFromViewStream and IntFromViewAccess which are both based on a MemoryMappedFile use the least memory of all cases and are the fasted too, only beaten by IntFromArray and IntFromDataReader for very small files. They combine the small memory footprint of streams with the high performance of arrays. So, if you need a lot of random access to files, the MemoryMappedFile is definitely an approach you should check out.

How to remove a section from a PE file

Currently I was asked how to remove a section from a PE file, while keeping the PE file executable. I’ve implemented the functionality in the PeNet library, and in this post I’ll explain how its done. To see how a section is added, see my other blog post: How to add a section to a PE file.

We want to remove the section header and the content of the section itself, such that we have a smaller executable than before. As an example, we remove the .rsrc (resource) section from calc.exe which reduces its size from 27kB to only 9kB while keeping all functionality available. As the PE parser we use PeNet, which allows easy access to all needed structures of the PE header.

From a high level view we need to do these things:

  • Adjust NumberOfSections in the IMAGE_FILE_HEADER
  • Remove the section from the IMAGE_SECTION_HEADER array
  • Remove the content of the section from the PE file
  • Adjust the physical addresses of the remaining sections in the IMAGE_SECTION_HEADER array
  • Adjust the virtual size of the remaining sections in the IMAGE_SECTION_HEADER array
  • Adjust the corresponding entry in the IMAGE_DATA_DIRECTORY array (if any)

First, we get the section we want to remove from the IMAGE_DATA_DIRECTORY array, as we need the data from the section later. Then we create a new list of sections without the .rsrc section.

var sectionToRemove = ImageSectionHeaders.First(s => s.Name == ".rsrc");
var newSections = ImageSectionHeaders.Where(s => s.Name != ".rsrc").ToArray();

As we remove one section, we need to adjust the NumberOfSections in the IMAGE_FILE_HEADER.

ImageNtHeaders!.FileHeader.NumberOfSections--;

After that, we remove the content of the section. As the binary gets smaller, we need to adjust the physical addresses of all sections that follow the section we removed, because they are now further up in the binary. To do so, we need to subtract the size of the section we removed from the raw address of the following sections. After that we remove the content itself from the PE file.

// Adjust the physical address of all sections
foreach (var s in newSections)
{
    if (s.PointerToRawData > sectionToRemove.PointerToRawData)
    {
        s.PointerToRawData -= sectionToRemove.SizeOfRawData;
    }
}

// Remove section content
RawFile.RemoveRange(sectionToRemove.PointerToRawData, sectionToRemove.SizeOfRawData);

As we now have destroyed the virtual sizes of the section headers which came before the section we removed, we need to fix them as well. Note: I adjust all section sizes, while technically the one before the section we removed would be enough, but the approach below is easier to implement and works as well. To adjust the virtual size of the sections, we are setting it to the virtual address of the next section minus the virtual address of the section we adjust. We do that for all sections which are before the section we remove.

for (var i = 1; i < newSections.Count(); i++)
{
    if(newSections[i - 1].VirtualAddress < sectionToRemove.VirtualAddress)
    {
        newSections[i - 1].VirtualSize = newSections[i].VirtualAddress - newSections[i - 1].VirtualAddress;
    }
}

At the moment, our new sections are only in-memory as we did not write the new sections to file yet. Before we write the new sections to the binary, we create a byte array from our newSections array, which we created above.

var sizeOfSection = 0x28;
var newRawSections = new byte[newSections.Count() * sizeOfSection];

for (var i = 0; i < newSections.Count(); i++)
{
    Array.Copy(newSections[i].ToArray(), 0, newRawSections, i * sizeOfSection, sizeOfSection);
}

As an intermediate step, we fix the IMAGE_DATA_DIRECTORY entry by setting it to “0”, if there exists any for the section we delete. This is not necessary as Windows does not care for a directory entry which points to data that does not exists, but as we do not want to leave any traces, we set it to “0”.

var de = ImageNtHeaders
         .OptionalHeader
         .DataDirectory
         .FirstOrDefault(d => d.VirtualAddress == sectionToRemove.VirtualAddress
              && d.Size == sectionToRemove.VirtualSize);

if (de != null)
{
    de.Size = 0;
    de.VirtualAddress = 0;
}

As a last step, we null the old IMAGE_SECTION_HEADER array in the binary and then write our new (but smaller) one on the same offset.

var sectionHeaderOffset = ImageDosHeader!.E_lfanew + ImageNtHeaders!.FileHeader.SizeOfOptionalHeader + 0x18;
RawFile.WriteBytes(sectionHeaderOffset, new byte[ImageSectionHeaders.Count() * sizeOfSection]);
RawFile.WriteBytes(sectionHeaderOffset, newRawSections);

That’s it! We can save the edited binary to disk and run it and every thing works as expected. You can find the library Implementation here: RemoveSection in PeNet

The feature is implement in PeNet version 2.1.0-alpha1 and up.

A full code example which removes a section from a file and dumps the new file to disk looks like this:

using PeNet;
using System.IO;

namespace StripSection
{
    class Program
    {
        static void Main(string[] args)
        {
            using var peFile = new PeFile("calc.exe");
    
            // Remove rsrc from section headers
            peFile.RemoveSection(".rsrc");

            // Save the changed binary to disk
            File.WriteAllBytes("calc-rsrc.exe", peFile.RawFile.ToArray());
        }
    }
}

.NET Random Access Performance on Files – Part 1

Since a few years I’m running a project where I read a file into a byte buffer and do a lot of random accesses on it. This works pretty well for small files (few MB) but if the files get larger, the performance hit due to the initial read of the whole file gets significant.

With the help of the amazing BenchmarkDotnet I’ve wrote a test suite to gather performance insights into different methods for random access on files.

Test Scenario

We create files with the size of 10 000, 1 000 000, 10 000 000 and 100 000 000 bytes. For each of these files 1 000 random reads are tested. For the random access read, we are reading a byte and an integer to test if there is a difference in the performance due to the amount of data read.

MethodDescription
ByteFromArrayRead the whole file into a byte array and read random bytes
IntFromArrayRead the whole file into a byte array and read random integers
ByteFromStreamOpen the file as a FileStream and read random bytes
IntFromStreamOpen the file as a FileStream and read random integers
ByteFromDataReaderOpen the file in a custom DataReader and read random bytes
IntFromDataReaderOpen the file in a custom DataReader and read random integers
ByteFromBufferedStreamOpen the file in a FileStream and create a BufferedStream from that, than read random bytes
IntFromBufferedStreamOpen the file in a FileStream and create a BufferedStream from that, than read random integers
ByteFromBufferedStreamWithInitSizeOpen the file in a FileStream and create a BufferedStream with an initial size of the file size from that, than read random bytes
IntFromBufferedStreamWithInitSizeOpen the file in a FileStream and create a BufferedStream with an initial size of the file size from that, than read random integers
ByteFromStreamBinaryReaderOpen the file in a FileStream and create a BinaryReader from that, than read random bytes
IntFromStreamBinaryReaderOpen the file in a FileStream and create a BinaryReader from that, than read random integers
Random Access File Read Methods

The DataReader is a custom class that allocates a buffer of the size of the file but only reads to the currently used max offset. All data read until the offset is cached, which should make access to any random access with a smaller offset much faster.

Test Environment

All test are built with .NET Core SDK 3.1.200-preview-015002 and ran with .NETCore 3.1.2 on Windows 10 Pro Version 10.0.19041 Build 19041. CPU was a Intel i9-9000k with logical 16 Cores and 32 GB of RAM. A NVMe was used as the storage for the files tested.

Test Results

After the benchmark ran through, we got the following results.

The chart shows the run-time of every method for files of different size.
I’ve omitted the evaluation for bytes as the result is basically the same as for integers and adding them to the chart would make it harder to read while not providing any additional information.

The evaluation shows that for all Stream based approaches, the run-time for 1000 random accesses to read an integer is pretty much the same, regardless of the size of the file. That is interesting, as I thought that at least the buffered streams are faster, but maybe FileStream is using a buffer internally already.

Even more interesting is the fact that the direct read from an array gets super slow for large arrays, while it is super fast for small arrays. My intuition was that it should be somehow constant.

The only method that is fast for small arrays and fast for large arrays is my self written DataReader, but again, my intuition was another. I though it would be slower than the array version and faster than the stream versions. From the performance point of view it’s the clear winner. It’s 26 times faster for large files as direct array access and still 1.67 times faster than streams. For small files the difference is not that big but still there is one. It’s 0.2 times slower for small files but 67 times faster than streams.

Lets have a look at the memory usage of all methods. For my use-case memory doesn’t matter that much, but I want to point out that the performance win comes with a downside, too.

No big surprise here. The array and DataReader methods are both allocating space for the whole file, which leads to a lot of allocated memory for them. The stream methods on the other hand are constant in their memory consumption as they seem to read the file “on demand”.

Conclusion

For my use-case, I’m going to use my own implementation as the default but to be able to switch it any time for something more appropriate I’ll capsule it into an interface. If any of my readers knows better ways to solve the problem I’ve described I’m happy to add them to the benchmark and update the post.

You can find all code used here on Github: Dotnet File Random Access Performance

Check-out part 2 with MemoryMappedFiles here: .NET Random Access Performance on Files – Part 2

Writing a native library in F# which can be called from C++

Recently I was asked if it’s possible to call a library written in C# from a native C++ library on Windows. I remembered that I’ve read something about native libraries in C# and CoreRT. I’ve used CoreRT a lot and already blogged about it: Compile a .NET Core app to a single native binary

If an executable binary is possible in C#, a library should be possible too, right? As it turns out it is! I’ve followed the tutorial Writing Native Libraries in C# and using them in other languages and it worked on the first try.

As I am a huge fan of the clean and simple syntax and structure of the F# programming language, the logical next step was to port the C# library to F#, which can be called by C++ (or any other language that can call standard C ABI).

Create a native F# library

First, create a new F# library project.

mkdir src
dotnet new classlib -lang=F# -o .\src\NativeLib

Now add a nuget.config file to the project, as we need an additional NuGet source for the native compiler. Add the following content to the nuget.config file.

<?xml version="1.0" encoding="utf-8"?>
<configuration>
  <packageSources>
    <!--To inherit the global NuGet package sources remove the <clear/> line below -->
    <clear />
    <add key="dotnet-core" value="https://dotnetfeed.blob.core.windows.net/dotnet-core/index.json" />
    <add key="nuget.org" value="https://api.nuget.org/v3/index.json" protocolVersion="3" />
  </packageSources>
</configuration>

To be able to export a function with an interface callable from C++, we need to annotate the function with an attribute. Create the file NativeCallable.fs with the following content.

namespace System.Runtime.InteropServices
    open System
    open System.Runtime.InteropServices

    [<AttributeUsage(AttributeTargets.Method)>]
    type NativeCallableAttribute() 
        = inherit System.Attribute()
            [<DefaultValue>] val mutable public EntryPoint : string
            [<DefaultValue>] val mutable public CallingConvention : CallingConvention

The next step is the actual library with the functions we want to export. Create a file NativeLibrary.fs with the functions we want to export, annotated with the custom attribute we just created.

module NativeLibrary
open System.Runtime.InteropServices
open System
    
[<NativeCallable(EntryPoint = "add", CallingConvention = CallingConvention.StdCall)>]
let Add (a: int) (b: int) : int =
    a + b

[<NativeCallable(EntryPoint = "write_line", CallingConvention = CallingConvention.StdCall)>]
let WriteLine (pString: IntPtr) : int =
    try
        let str = Marshal.PtrToStringAnsi(pString)
        Console.WriteLine(str)
        0
    with
    | _ -> -1

This exports two functions. The first add will add two integers and the second one write_line writes a line to stdout.

To be able to compile to a native library we need to modify the NativeLib.fsproj file to contain a reference to the CoreRT compiler and we add a few optimizations to reduce the size of the binary. To learn more about optimizations see: Optimizing CoreRT

<Project Sdk="Microsoft.NET.Sdk">

  <PropertyGroup>
    <TargetFramework>netstandard2.0</TargetFramework>
    <Platforms>AnyCPU;x64</Platforms>
  </PropertyGroup>

  <ItemGroup>
    <Compile Include="NativeCallable.fs" />
    <Compile Include="NativeLibrary.fs" />
  </ItemGroup>

  <ItemGroup>
    <PackageReference Include="Microsoft.DotNet.ILCompiler" Version="1.0.0-alpha-*" />
  </ItemGroup>

  <PropertyGroup>
    <IlcInvariantGlobalization>true</IlcInvariantGlobalization>
    <RootAllApplicationAssemblies>false</RootAllApplicationAssemblies>
    <IlcGenerateCompleteTypeMetadata>false</IlcGenerateCompleteTypeMetadata>
    <IlcGenerateStackTraceData>false</IlcGenerateStackTraceData>
    <IlcOptimizationPreference>Size</IlcOptimizationPreference>
    <IlcFoldIdenticalMethodBodies>true</IlcFoldIdenticalMethodBodies>
  </PropertyGroup>

</Project>

Our library is now complete, so its time to compile it to a native Windows DLL.

dotnet publish /p:NativeLib=Shared -r win-x64 -c Release

This creates a DLL and a Lib in the folder $(SolutionDir)\src\NativeLib\bin\Release\netstandard2.0\win-x64\native.

You can check if everything worked by having a look at the exports of the DLL on penet.io. Just upload the created DLL and click on Exports.

We can clearly see our two functions are in the export table of the DLL.

Create a native C++ app and use our F# DLL

The F# part was the easy one. As usually C++ is a big pain, as we need to configure the linker to use our library.

First, we create a new empty C++ console application. Then we create a header file called NativeLib.h with the declarations for our functions.

#pragma once
extern "C" int __stdcall add(int a, int b);
extern "C" void __stdcall write_line(const char* pString);

After that, we create our Main.cpp file with the following content:

#include <iostream>
#include "NativeLib.h"
using namespace std;

int main()
{
    int result = add(1, 2);
    cout << result << endl;
    write_line("Hello World!");

    return 0;
}

As we built our F# library for x64, switch the configuration for the build to x64 in the Configuration Manager.

Next, we need to edit the properties of the project. Open the settings and change the following values. Make sure to select All Configurations to change the values for Debug and Release.

  • General -> Output Directory = $(ProjectDir)bin\$(Platform)\$(Configuration)\
  • Linker -> General -> Additional Library Directories = $(SolutionDir)src\NativeLib\bin\Release\netstandard2.0\win-x64\native;%(AdditionalLibraryDirectories)
  • Linker -> Input -> Additional Dependencies = NativeLib.lib;%(AdditionalDependencies)
  • Build Events -> Post-Build Events = xcopy /y /d “$(SolutionDir)src\NativeLib\bin\Release\netstandard2.0\win-x64\native\NativeLib.dll” “$(OutDir)”

The build event guarantees that our previously built F# library will be copied to the output folder of the C++ console application.

Now build and run the C++ console application and the following output appears:

3
Hello World!

You can find the complete code on Github: Native F# Library.

Enhanced Session Mode under Fedora 28

Update: For a script to install and configure Enhanced Session Mode instead of running the command below manually, see:
Enhanced Session Mode Install Script

 Microsoft is investing heavily in Linux and while doing so, the Linux guest support for their own hyper-visor (Hyper-V) was improved in the last years. While Ubuntu got a lot of love (Enhanced Linux VMs) and is already available as a “Quick Create” VM (Ubuntu Hyper-V Image) in Hyper-V, the other big Linux distribution Fedora was left behind.

In this blog post, I’ll provide a short tutorial how you can enable the Enhanced Session Mode for Fedora 28 guests on a Windows 10 host with Hyper-V. The Enhanced Session Mode allows full-screen RDP into the guest VM and working copy-paste between guest and host in both directions using the free Remote Desktop Protocol (RDP) imlementation xrdp.

Enable Enhanced Session Mode for Fedora 28

You need an up-to-date Windows 10 machine with Hyper-V enabled and a Fedora VM (Generation 2) which runs in Hyper-V.

Load Hyper-V kernel module

First, load the Hyper-V kernel module.

echo "hv_sock" > /etc/modules-load.d/hv_sock.conf

If the echo command does not work, create the file with vim and enter the line hv_sock manually.

Set SELinux to permissive

Attention: This step lowers the security of your system significantly!

Open the file /etc/sysconfig/selinux and set the line SELINUX=permissive.

# This file controls the state of SELinux on the system.
# SELINUX= can take one of these three values:
#       enforcing - SELinux security policy is enforced.
#       permissive - SELinux prints warnings instead of enforcing.
#       disabled - SELinux is fully disabled.
SELINUX=permissive
# SELINUXTYPE= type of policy in use. Possible values are:
#       targeted - Only targeted network daemons are protected.
#       strict - Full SELinux protection.
SELINUXTYPE=targeted

# SETLOCALDEFS= Check local definition changes
SETLOCALDEFS=0

Recompile xrdp with Hyper-V support

To enable xrdp with Hyper-V support you have to recompile xrdp with the --enable-vsock flag.

Install RPM tools with:

sudo dnf install rpmdevtools rpm-build

Setup the RPM directory hierarchy:

rpmdev-setuptree

This creates the ~/rpmbuild folder where new RPM packages can be build.
Download the xrdp source code:

dnf download --source xrdp

Install the xrdp source code into the ~/rpmbuild directory.

rpm -ivh xrdp-0.9.8-1.fc28.src.rpm

Resolve all build dependencies for xrdp

sudo dnf builddep xrdp

Enable Hyper-V socket support for xrdp by editing the ~/rpmbuild/SPECS/xrdp.spec file. Add --enable-vsock to the configuration.

%configure --enable-fuse --enable-pixman --enable-painter --enable-vsock

Save and close the file.
Build a new RPM package from source:

rpmbuild -bb ~/rpmbuild/SPECS/xrdp.spec

Install xrdp

After you’ve build a new xrdp package with Hyper-V sockets enabled, simply install it as a service and enable it.

sudo dnf install -y ~/rpmbuild/RPMS/x86_64/xrdp-0.9.8-1.fc28.x86_64.rpm
sudo systemctl enable xrdp
sudo systemctl start xrdp

Configure xrdp

Edit /etc/xrdp/xrdp.ini and set the values:

use_vsock=true
security_layer=rdp
crypt_level=none
bitmap_compression=false
max_bpp=24

Edit /etc/xrdp/sesman.ini and set the values:

X11DisplayOffset=0

Create the file /etc/X11/Xwrapper.conf and set:

allowed_users=anybody

Save and close the file.

Prevent xrdp from reinstalling

Fedora will update to an xrdp version without Hyper-V activated. To prevent this, disable the update for xrdp.

echo "exclude=xrdp" | sudo tee -a /etc/dnf/dnf.conf > /dev/null


Enable Enhanced Session Mode

Shutdown the Fedora VM and open a PowerShell on your Windows 10 host system. Type the following command and replace the VM name with the name of your Fedora VM.

Set-VM -VMName "Fedora VM Name" -EnhancedSessionTransportType HvSocket

Now, start the Fedora VM and the enhanced session dialog should pop-up. Go to Show Options --> Local Resources and uncheck Printers. Go back to Display and check the Save my settings ... checkbox. Click Connect and a prompt asks for your Fedora user credentials. Enter them and use Xvnc as the protocol.

Enjoy your Fedora with full screen support and copy-paste between guest and host in both directions!

Run your own FaaS with OpenFaas and .Net Core

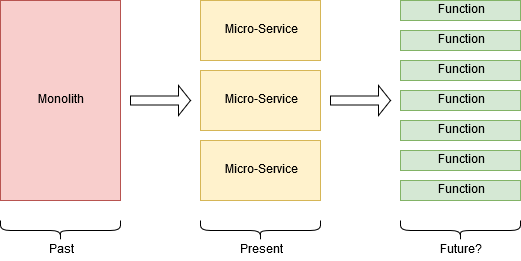
A few years ago we all built monolithic applications which where hard to deploy and maintain. Mostly they were pushed to some application server for hosting like IIS or JBoss. Currently everyone is doing micro-services and that often in combination with Docker for easy build and deployment, but the next big thing is right around the corner. Functions-as-a-Service (FaaS) is hot right now in the software development scene and that’s why we have a look at it today.

FaaS

The idea behind functions is to do exactly one thing and that well. FaaS takes away the complexity of building, deploying and hosting such functions. Commercial vendors are already providing FaaS in their server-less offers. The most popular being Azure Functions and AWS Lambda.

But what if you want to run FaaS on premise on your own computer in your companies data center? This is where OpenFaaS comes into the play. OpenFaaS is an open-source function-as-a-service platform which runs on Docker. This means it easy to setup with Docker Swarm or Kubernetes.

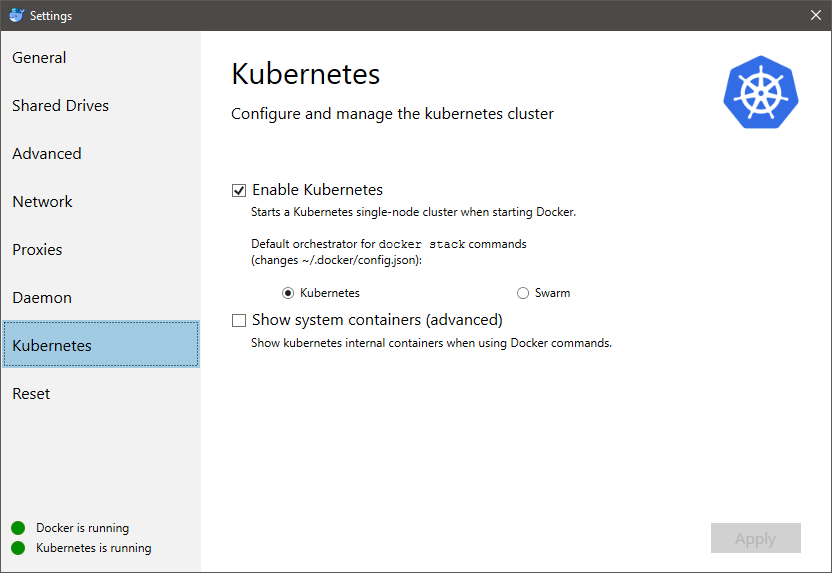
In this blog post I’ll show how to setup OpenFaaS locally on your Windows machine with Docker for Windows and Kubernetes. The good thing about Docker for Windows is that it comes with Kubernetes preinstalled. You just need to enable it and your Kubernetes clusters runs.

Kubernetes DfW

Furthermore you need a Docker Hub account to push your Docker images to. Unfortunately Kubernetes does not use the local Docker repository on your computer to search for images.

Install OpenFaaS on Kubernetes

Installing OpenFaaS on a local Kubernetes cluster is pretty straight forward. Clone the repo and deploy to Kubernetes.

git clone https://github.com/openfaas/faas-netes
kubectl apply -f https://raw.githubusercontent.com/openfaas/faas-netes/master/namespaces.yml
cd faas-netes
kubectl apply -f ./yaml

That’s it. Your OpenFaaS in running and ready to be used!

We can access the web UI of OpenFaaS with a browser. Since Kubernetes forwards the OpenFaaS on some random port, we need to get the port on which the service is listening.

kubectl get services --selector="app=gateway" --namespace openfaas

This should show some output like this:

Output:
NAME      TYPE       CLUSTER-IP       EXTERNAL-IP   PORT(S)          AGE
gateway   NodePort   10.111.109.152           8080:31112/TCP   22m

This tells us that OpenFaaS runs on localhost:31112. The UI is reachable under http://localhost:3112/ui.

Create a function in C#

Now, lets create a new function in C# with .Net Core. To do so, we need to download the OpenFaas CLI.

[Net.ServicePointManager]::SecurityProtocol = [Net.SecurityProtocolType]::Tls12
Invoke-WebRequest -Uri https://github.com/openfaas/faas-cli/releases/download/0.6.10/faas-cli.exe -OutFile faas-cli.exe

The function we want to build should return if a given string is a valid domain name. For example, given “google.com”, it should return “google.com is a valid domain name.” and for “google,com” (note the comma) it should return “google,com is not a valid domain name”.

First we create a new project from a template. The project name is valid-domain.

.\faas-cli.exe new --lang csharp valid-domain

After the operation completed, a folder valid-domain which contains a code template and a file valid-domain.yml are in our current directory.

Open the file .\valid-domain\FunctionHandler.cs. The class FunctionHandler contains a method Handle. This method is invoked, every time the function is requested. Change the content to the following.

using System;
using System.Text;

namespace Function
{
    public class FunctionHandler
    {
        public void Handle(string input) {
            input = SanitizeInput(input);

            if(IsValidDomainName(input))
                Console.WriteLine($"{input} is a valid domain name.");
            else
                Console.WriteLine($"{input} is not a valid domain name.");
        }

        private bool IsValidDomainName(string name)
        {
            return Uri.CheckHostName(name) != UriHostNameType.Unknown;
        }

        private string SanitizeInput(string input)
        {
            return input.Trim().Replace("\n", string.Empty).Replace("\r", string.Empty);
        }
    }
}

The function SanitizeInput is necessary, because OpenFaaS adds non-printable characters to the input string. If these characters are evaluated in the IsValidDomainName function, it will always return false. That’s all the code we need.

Now edit the .\valid-domain.yml file to look like this:

provider:
  name: faas
  gateway: http://127.0.0.1:31112

functions:
  valid-domain:
    lang: csharp
    handler: ./valid-domain
    image: docker_hub_name/valid-domain

Replace the port of the gateway with the port where OpenFaaS is listening on your machine. Replace the image prefix with your Docker Hub account name.

The next step is to build the function. This creates a local Docker image called valid-domain.

.\faas-cli.exe build -f .\valid-domain.yml

As mentioned above, Kubernetes doesn’t use the local Docker repository, so we are forced to upload our function to a public one.

$env:DOCKER_ID_USER="docker_hub_username"
docker login
docker tag valid-domain $env:DOCKER_USER_ID/valid-domain
docker push $env:DOCKER_USER_ID/valid-domain

When the image is pushed, we are ready to deploy the function to the local OpenFaaS instance.

.\faas-cli.exe deploy -f .\valid-domain.yml

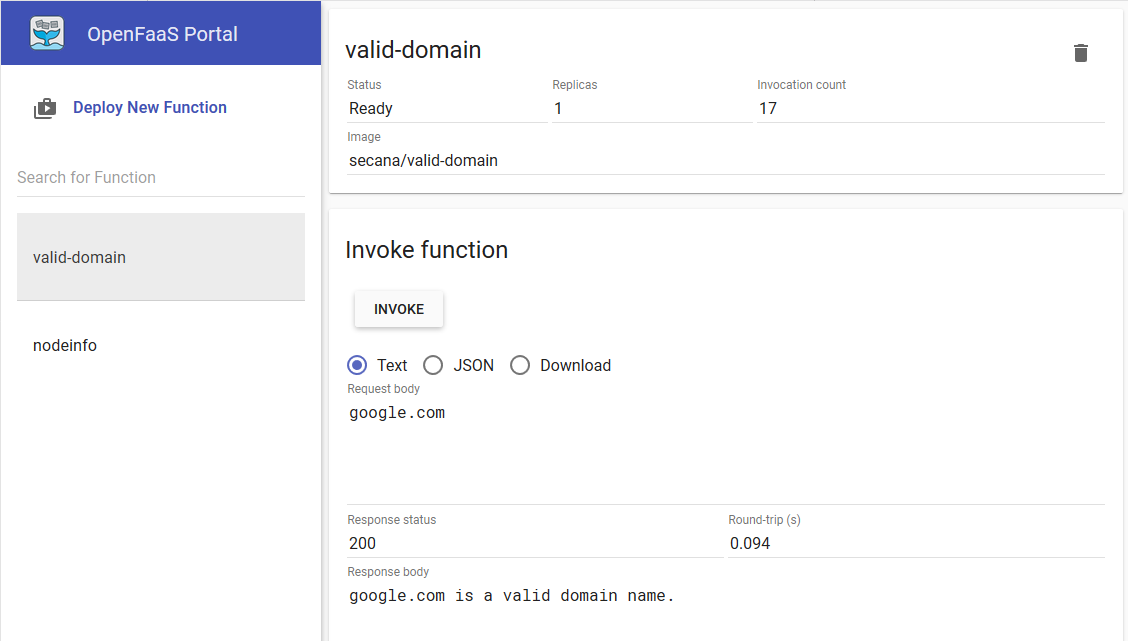
If the operation was successful, we have to wait a bit until the function is ready to use. You can check the state in the web UI. If the function is ready, we can try it out in the UI.
OpenFaas Example.png
It works! The function can be called over REST such that an easy invoke over PowerShell is possible.

(Invoke-WebRequest -Method Post -Uri http://localhost:31112/function/valid-domain -Body google.com).ToString()

google.com is a valid domain name.

(Invoke-WebRequest -Method Post -Uri http://localhost:31112/function/valid-domain -Body google,com).ToString()

google com is not a valid domain name.

As we can see above, our function works as expected. You can wrap any command line tool that takes input from stdin and outputs to stdout as a function without touching the code!

Compile a .Net Core app to a single native binary

Usually .Net code gets compiled to IL code which is then just-in-time (JIT) compiled on runtime to native code. This has has the advantage of platform independent code, but it also means that your app has a slower up-start time, because your code has to run through the jit compiler the first time it gets executed.

There are several scenarios where .Net code is already compiled to native code. For example UWP apps on Windows are compiled to native code on default with .Net Native. The same goes for iOS if you build an mobile app with Xamarin. Overt the years the .Net ecosystem got more and more ways to produce native code instead of IL.

The latest member of the .Net ecosystem .Net Core, which is the open-source cross-platform implementation of .Net, lacked the opportunity to compile directly to native code.

In this blog post I’ll show you, how you can compile an .Net Core app into native code using the CoreRT by utilizing RyuJIT to compile ahead-of-time (AOT) instead of JIT.

Create a native .Net Core app

First we have to create a new .Net Core app. This is the usual process without any magic attached.

dotnet new console -o HelloWorld
cd HelloWorld

As the next step we add the ILCompiler to the HelloWorld.csproj which does the actual AOT to native code.

<Project Sdk="Microsoft.NET.Sdk">

  <PropertyGroup>
    <OutputType>Exe</OutputType>
    <TargetFramework>netcoreapp2.1</TargetFramework>
  </PropertyGroup>

  <ItemGroup>
    <PackageReference Include="Microsoft.DotNet.ILCompiler" Version="1.0.0-alpha-*" />
  </ItemGroup>

</Project>


Unfortunately the ILCompiler package is in alpha and not available on nuget.org but on myget.org. This means that we have to add a new Nuget package source to the project.
Create a new file nuget.config in the root directory of your project with the following content.

<?xml version="1.0" encoding="utf-8"?>
<configuration>
 <packageSources>
    <clear />
    <add key="dotnet-core" value="https://dotnetfeed.blob.core.windows.net/dotnet-core/index.json" />
    <add key="nuget.org" value="https://api.nuget.org/v3/index.json" protocolVersion="3" />
 </packageSources>
</configuration>

Now restore all packages. This will pull the ILCompiler for the platform you are currently working on.

dotnet restore

Everything is prepared for some .Net AOT magic, now. The only thing you have to do, to create a native executable is publish the app with a given run-time identifier.

dotnet publish -c Release -r win-x64

You should see output like this:

Microsoft (R) Build Engine version 15.7.179.6572 for .NET Core
Copyright (C) Microsoft Corporation. All rights reserved.

Restore completed in 55,57 ms for .\HelloWorld.csproj.
HelloWorld -> .\bin\Release\netcoreapp2.1\win-x64\HelloWorld.dll
Generating native code
HelloWorld -> .\bin\Release\netcoreapp2.1\win-x64\publish\

If you now change the directory to .\bin\Release\netcoreapp2.1\win-x64\publish\ you’ll find a HelloWorld.exe there. This is your AOT compiled native executable.

To execute it just run it in the command line

HelloWorld.exe

Some words of caution: Since CoreRT is still in an early alpha stage, some features you are used to from the .Net languages won’t work. To find our what is currently supported and what is missing, have a look at the CoreRT project site.